This is the multi-page printable view of this section.
Click here to print.
Return to the regular view of this page.
Getting Started with Ohlala SmartOps
Deploy Ohlala SmartOps and begin managing EC2 instances through Microsoft Teams or Google Chat
What You’ll Accomplish
By completing this guide, you’ll be able to:
- Deploy SmartOps in your AWS account
- Connect it to Microsoft Teams, Google Chat, or both
- Execute your first EC2 management commands
- View health reports and cost optimization recommendations
Deployment Steps
The deployment process is organized into clear, manageable steps:
Estimated Time: 15-20 minutes total
Difficulty: Intermediate
Prerequisites: AWS account with admin access, plus either Azure account (for Teams) or Google Workspace (for Google Chat)
Verify you have everything needed before starting
- AWS account requirements
- Microsoft Teams or Google Workspace setup
- Required permissions
Configure AI model access in your AWS account
- Enable Claude Sonnet 4.5 model
- Verify regional availability
- Understand inference profiles
Get Ohlala SmartOps from AWS Marketplace
- Subscribe to the product
- Download CloudFormation template
- Understand pricing
Create and configure your Teams bot
- Create Azure Bot resource
- Generate authentication credentials
- Configure bot settings
Create Google Cloud Project and credentials
- Create GCP project
- Enable Google Chat API
- Generate service account credentials
Launch the infrastructure in AWS
- Configure stack parameters (including chat platform selection)
- Deploy resources
- Monitor deployment progress
Integrate the bot with Microsoft Teams
- Configure webhook URL
- Install Teams app
- Test the connection
Configure the Chat app and install the bot
- Configure Chat app with webhook URL
- Set visibility and permissions
- Install the app
Confirm everything is working
- Run test commands
- Check health reports
- Troubleshoot common issues
Quick Start Links
Pro Tips
- Start Simple: Begin with monitoring features before enabling modifications
- Budget Awareness: SmartOps includes intelligent cost tracking with $5 milestone warnings
- Clear Error Messages: The bot provides actionable guidance when issues occur
- Team Collaboration: Share the assistant with your team for maximum productivity
Need Help?
1 - Prerequisites
Check all requirements before deploying Ohlala SmartOps
Ohlala SmartOps supports Microsoft Teams, Google Chat, or both. Choose based on your organization’s needs:
| Platform |
Best For |
Requirements |
| Microsoft Teams |
Organizations using Microsoft 365 |
Azure account, Teams workspace |
| Google Chat |
Organizations using Google Workspace |
Google Cloud project, Workspace account |
| Both |
Organizations using both platforms |
All requirements from both |
Recommendation: If your organization primarily uses one platform, start with that. You can add the second platform later by updating your CloudFormation stack.
AWS Requirements
AWS Account
- Administrative access to create IAM roles, ECS clusters, and other resources
- AWS Marketplace subscription capability
- Billing enabled for AWS services usage
Required AWS Services
Ensure these services are available in your chosen region:
- Amazon ECS Fargate - Container orchestration
- Amazon Bedrock - AI model access
- API Gateway - Teams webhook endpoint
- CloudFormation - Infrastructure deployment
- Systems Manager (SSM) - Instance management
Existing Infrastructure
- At least 1 EC2 instance to manage
- SSM Agent installed on instances
Microsoft Teams Requirements
Skip this section if you plan to use Google Chat only.
Azure Account
- Azure subscription (Free tier works)
- Ability to create resources in Azure Portal
- Azure AD tenant for authentication
Teams Workspace
- Microsoft Teams installed and configured
- Admin permissions to install custom apps
- Teams channel where you want to add the bot
Google Workspace Requirements
Skip this section if you plan to use Microsoft Teams only.
- Google Cloud account with ability to create projects
- Billing enabled (for API usage tracking, minimal cost)
- Permissions to enable APIs and create service accounts
Google Workspace
- Google Workspace account (Business, Enterprise, or Education)
- Admin permissions to create and manage Chat apps, or
- Developer permissions to create internal Chat apps
- Google Chat enabled in your Workspace
Note: Personal Gmail accounts cannot create Chat apps for workspace use. You need a Google Workspace account.
Knowledge Requirements
Recommended Skills
- Basic understanding of AWS services
- Familiarity with CloudFormation
- Experience with your chosen chat platform administration (Teams or Google Chat)
- Understanding of bot concepts
Pre-Deployment Checklist
Use this checklist to verify readiness:
AWS (Required for all)
Microsoft Teams (if using Teams)
Google Chat (if using Google Chat)
Regional Availability
Ohlala SmartOps works in ALL AWS regions through intelligent inference profile selection!
Recommended Regions
For optimal performance, we recommend:
- US East (N. Virginia) - us-east-1
- US West (Oregon) - us-west-2
- Europe (Ireland) - eu-west-1
- Europe (Frankfurt) - eu-central-1
All Supported Regions
The solution works in any region with ECS Fargate support. Bedrock access is automatically handled through cross-region inference profiles.
Next Step
Once you’ve verified all prerequisites:
Continue to Bedrock Setup →
2 - Enable Amazon Bedrock
Configure Amazon Bedrock Claude model access for AI capabilities
Important: You MUST enable Amazon Bedrock Claude model access before deployment. Without this, the bot will display an error message guiding you to enable model access.
Why Bedrock is Required
Ohlala SmartOps uses Amazon Bedrock with Claude Sonnet 4.5 to provide:
- Natural language understanding of your commands
- Intelligent analysis of infrastructure issues
- Smart recommendations for optimization
- Context-aware responses based on your environment
Step-by-Step Setup
1. Open Amazon Bedrock Console
Navigate to the Amazon Bedrock console in your deployment region:
Open Amazon Bedrock Console
Important: Open Bedrock in the same region where you plan to deploy Ohlala SmartOps.
2. Navigate to Model Access
In the left sidebar, click on “Model access”
3. Enable Claude Sonnet 4.5
- Click “Modify model access”
- Find and enable:
- Claude Sonnet 4.5 (anthropic.claude-sonnet-4-5-*)
- Click “Submit” to request access
4. Wait for Approval
- Standard models are usually approved immediately
- Wait for status to show “Access granted”
- Refresh the page if needed

Regional Considerations
How Regional Access Works
Ohlala SmartOps automatically handles regional model access:
- Detects your deployment region
- Uses the optimal inference profile for your location
- No additional configuration needed
- Same performance across all regions
Primary Regions (Native Support)
Best performance in these regions:
- US East (N. Virginia) - us-east-1
- US West (Oregon) - us-west-2
- Europe (Frankfurt) - eu-central-1
- Europe (Ireland) - eu-west-1
- Asia Pacific (Tokyo) - ap-northeast-1
- Asia Pacific (Sydney) - ap-southeast-2
All Other Regions
Supported via cross-region inference profiles:
- Europe (Paris) - eu-west-3
- Europe (London) - eu-west-2
- Asia Pacific (Singapore) - ap-southeast-1
- Asia Pacific (Mumbai) - ap-south-1
- Canada (Central) - ca-central-1
- South America (São Paulo) - sa-east-1
- And more…
Verify Access
Check Model Status
- Return to the Model access page
- Verify Claude Sonnet 4.5 shows “Access granted”
- Note the model ID pattern:
anthropic.claude-sonnet-4-5-*
Troubleshooting
Model Not Available
- Issue: Claude Sonnet 4.5 not listed
- Solution: Check you’re in a supported region
Access Denied After Deployment
- Issue: Bot shows “Model access required” error
- Solution:
- Enable model access as shown above
- Wait for “Access granted” status
- No need to redeploy - the bot will work automatically
Request Pending Too Long
- Issue: Status stuck on “Pending”
- Solution:
- Cancel and resubmit the request
- Contact AWS Support if issues persist
Good to Know
Model Costs
- Input: $3.00 per million tokens
- Output: $15.00 per million tokens
- Average command uses ~500-2000 tokens
- Built-in cost tracking alerts you at $5 milestones
Alternative Models
Currently, only Claude Sonnet 4.5 is supported. Support for additional models may be added in future releases.
Next Step
Once Bedrock access is enabled:
Continue to AWS Marketplace →
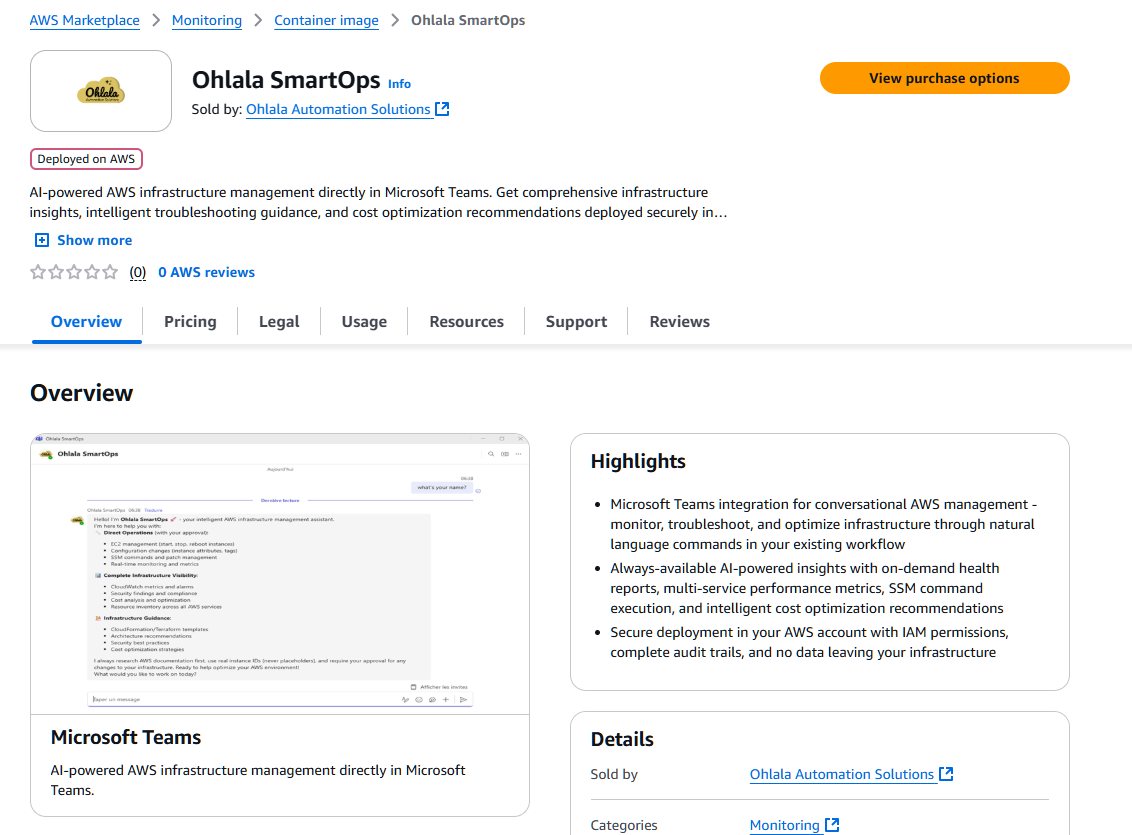
3 - AWS Marketplace Subscription
Subscribe to Ohlala SmartOps through AWS Marketplace
What You’ll Get
The AWS Marketplace subscription provides:
- Official CloudFormation template
- Pre-built container images
- Automatic updates
- AWS support integration
- Simplified billing through AWS
Subscription Steps
1. Navigate to AWS Marketplace
Open the Ohlala SmartOps product page:
AWS Marketplace - Ohlala SmartOps
2. View Purchase Options
Click “View purchase options” to start the subscription process.
3. Subscribe to the Product
Scroll down and click “Subscribe” to accept the terms.
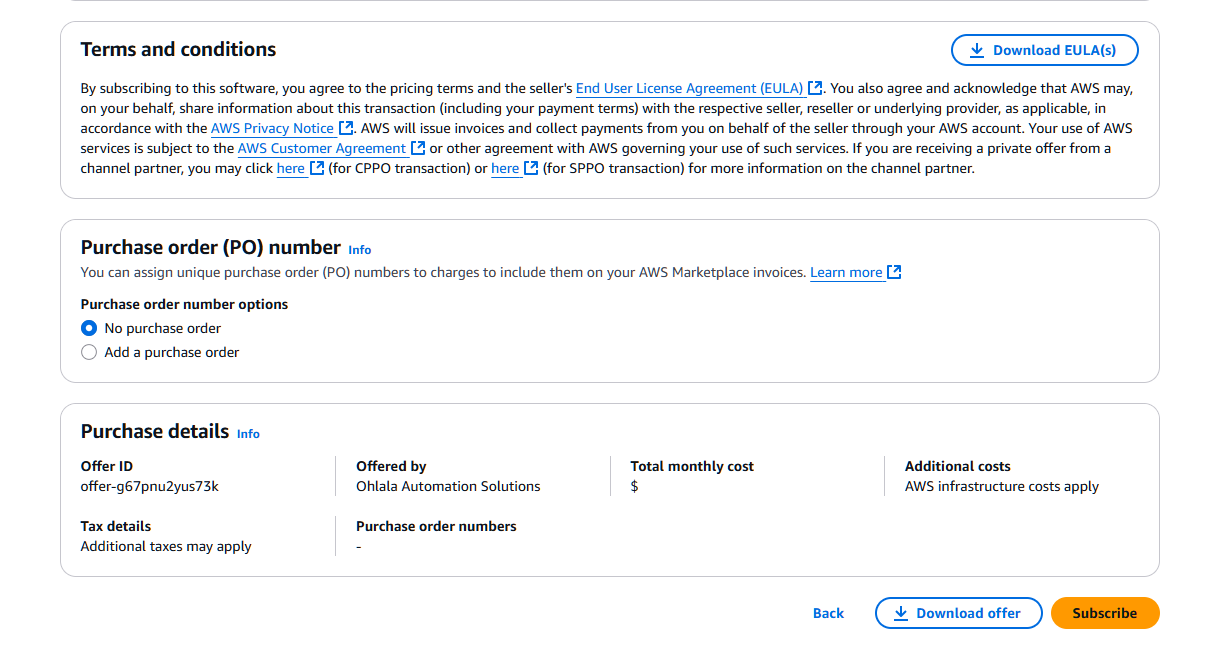
Note: Subscription activation typically takes 1-2 minutes. Wait for the confirmation before proceeding.
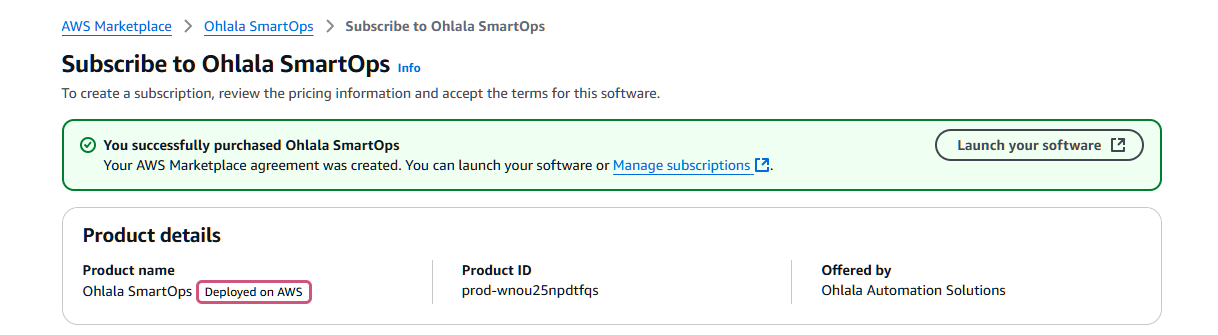
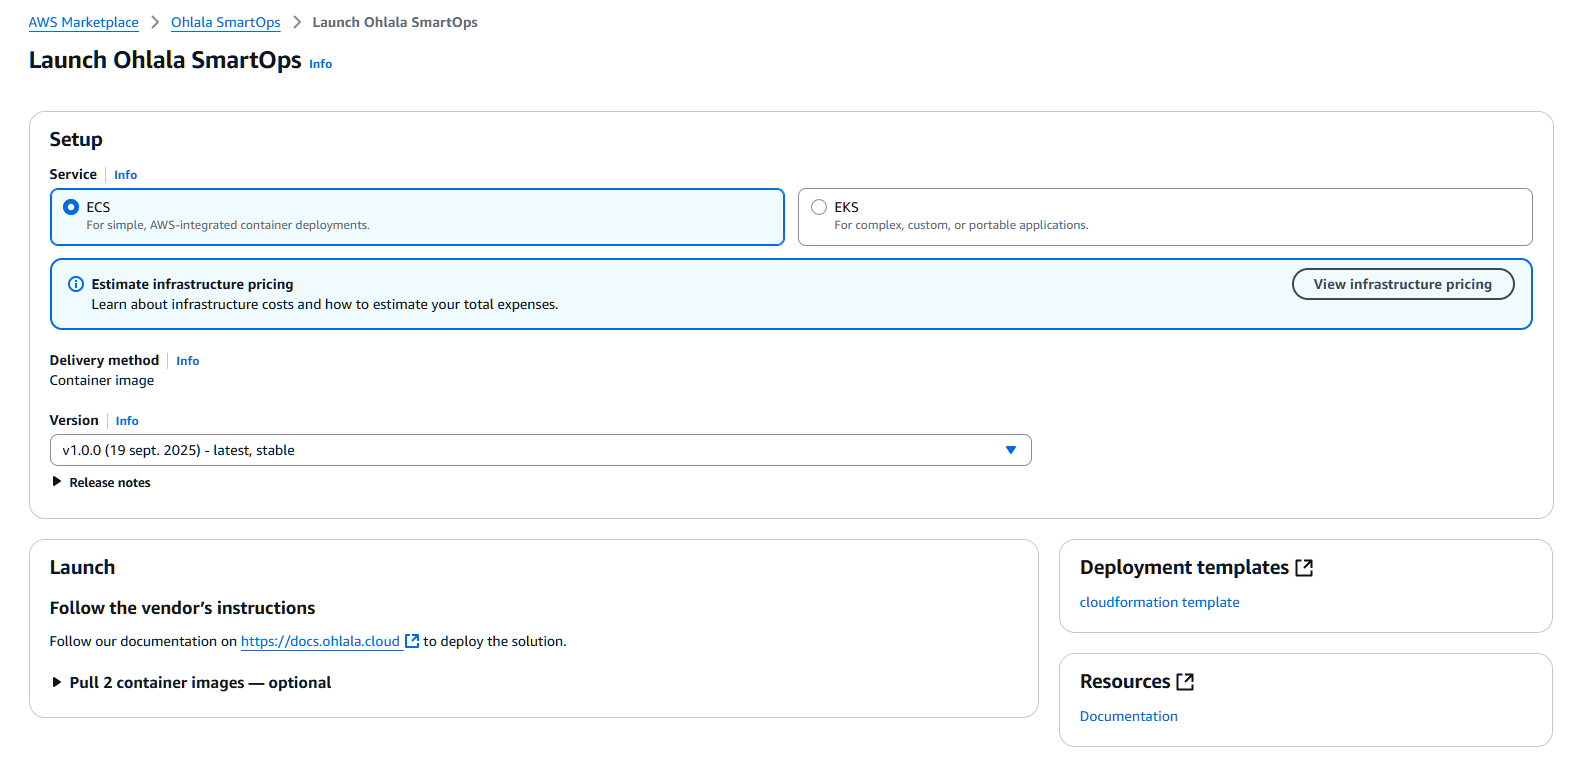
4. Launch Your Software
Once subscribed, click “Launch your software” to proceed with deployment.
- Select “Amazon ECS” as the launch method
- Click the “cloudformation template” link to download
- Save the template file locally - you’ll need it in the next steps
- Alternatively, you can download the cloudformation template here: Download Template
Verify Subscription
Check Subscription Status
- Go to AWS Marketplace → Manage subscriptions
- Find “Ohlala SmartOps” in your subscriptions
- Verify status shows “Active”
Download Template Backup
Important: Save the CloudFormation template file! You’ll need it for deployment.
Common Questions
Q: Can I cancel anytime?
A: Yes, you can cancel the subscription anytime through AWS Marketplace. You only pay for resources used.
Q: Can I deploy multiple instances?
A: Yes, you can deploy multiple stacks using the same subscription. Contact us for volume licensing.
Q: How do updates work?
A: Updates are provided through new versions in Marketplace. You can update at your convenience.
Next Step
With your subscription active and template downloaded:
Continue to Azure Bot Setup →
4 - Azure Bot Registration
Create and configure your Microsoft Teams bot in Azure
What You’ll Create
- Azure Bot resource for Teams integration
- Authentication credentials (App ID, Password, Tenant ID)
- Secure communication channel with Teams
Step-by-Step Setup
1. Access Azure Portal
Navigate to Azure Portal and sign in:
https://portal.azure.com
Free Azure Account: If you don’t have an Azure account, you can create one for free with $200 credits.
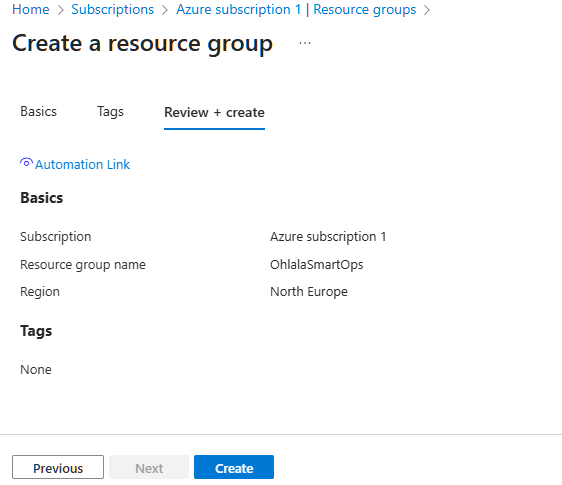
2. Create Resource Group (Optional)
It’s recommended to create a dedicated resource group:
- Search for “Resource groups” in the search bar
- Click “Create”
- Configure:
- Subscription: Your Azure subscription
- Resource group:
ohlala-smartops-rg
- Region: Choose any region (e.g., North Europe)
- Click “Review + create” then “Create”
3. Create Azure Bot
Search for Azure Bot
In the Azure Portal search bar, type “Azure Bot” and select it from the marketplace.

Fill in the bot configuration:
Bot handle: OhlalaSmartOps
Subscription: Your Azure subscription
Resource group: ohlala-smartops-rg (or your chosen group)
Location: North Europe (or your preferred region)
Pricing tier: F0 (Free)
Type: Single Tenant (default)
Microsoft App ID: Create new
Bot Handle: Choose a unique name. This won’t be visible to end users.
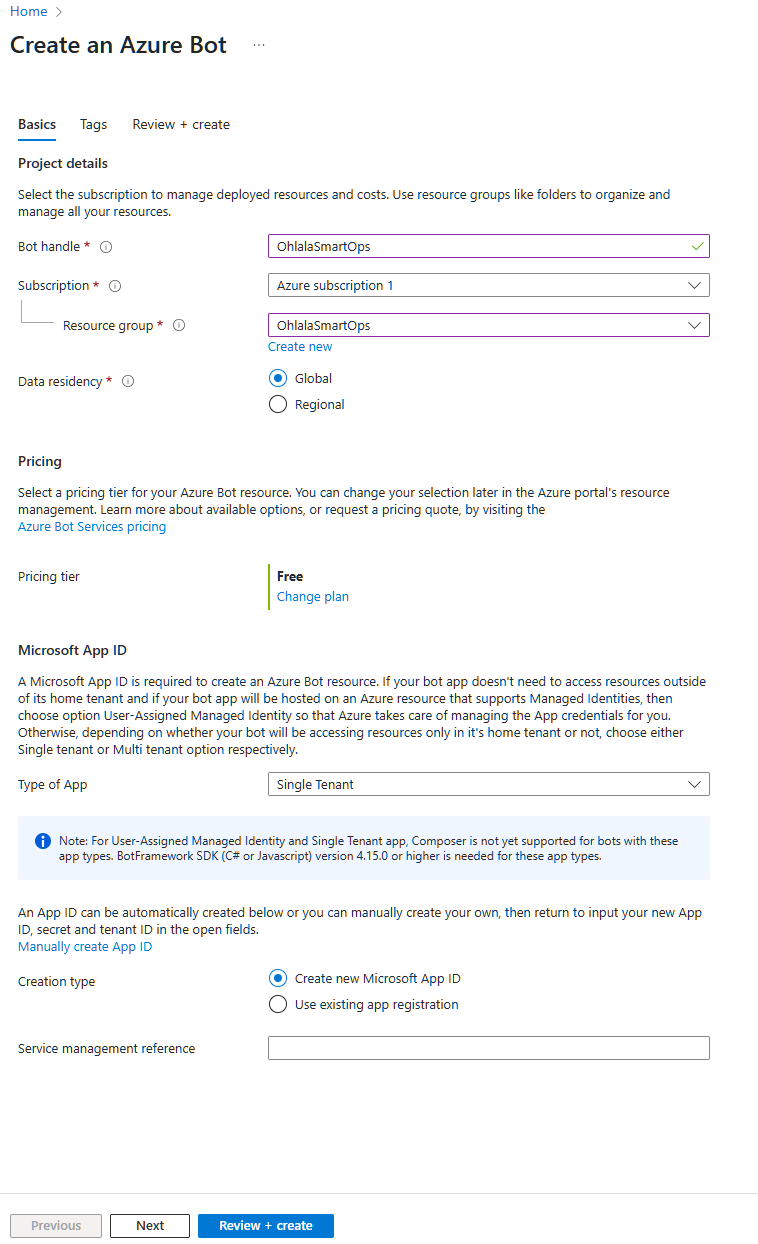
Click “Review + create” then “Create”. Deployment takes about 1-2 minutes.
4. Get Authentication Credentials
After deployment completes, go to your bot resource.
Navigate to Configuration
- Go to Settings → Configuration
- You’ll see the Microsoft App ID - copy and save this
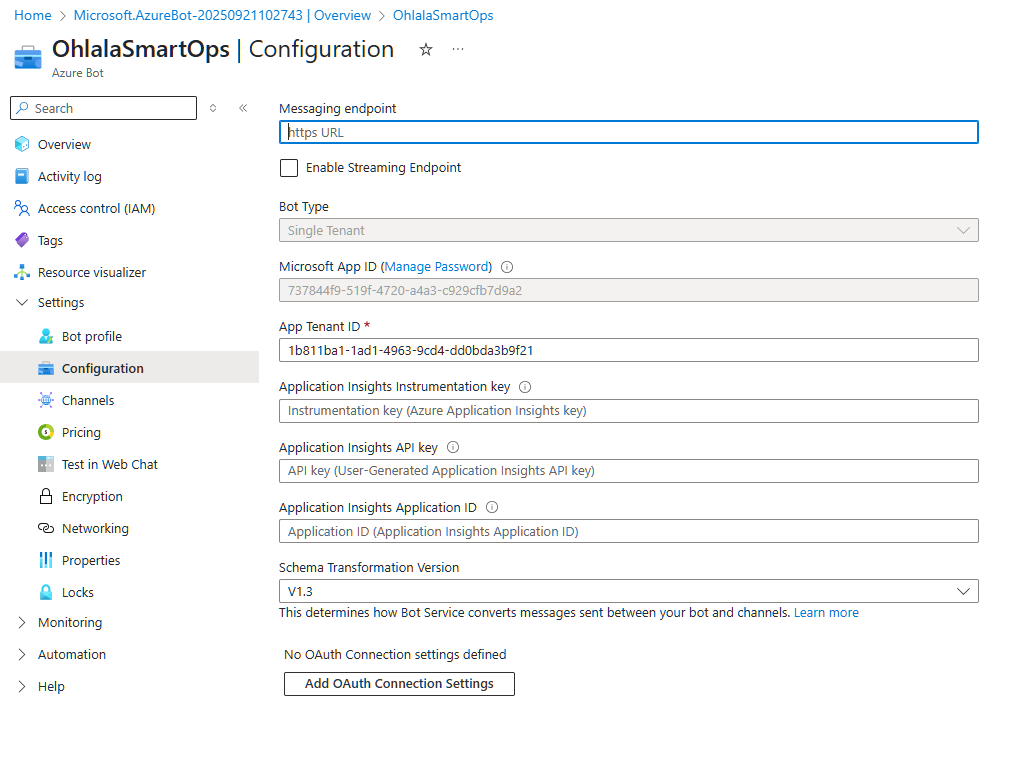
Create App Password
- Click “Manage Password” next to the App ID
- In the new window, click “New client secret”
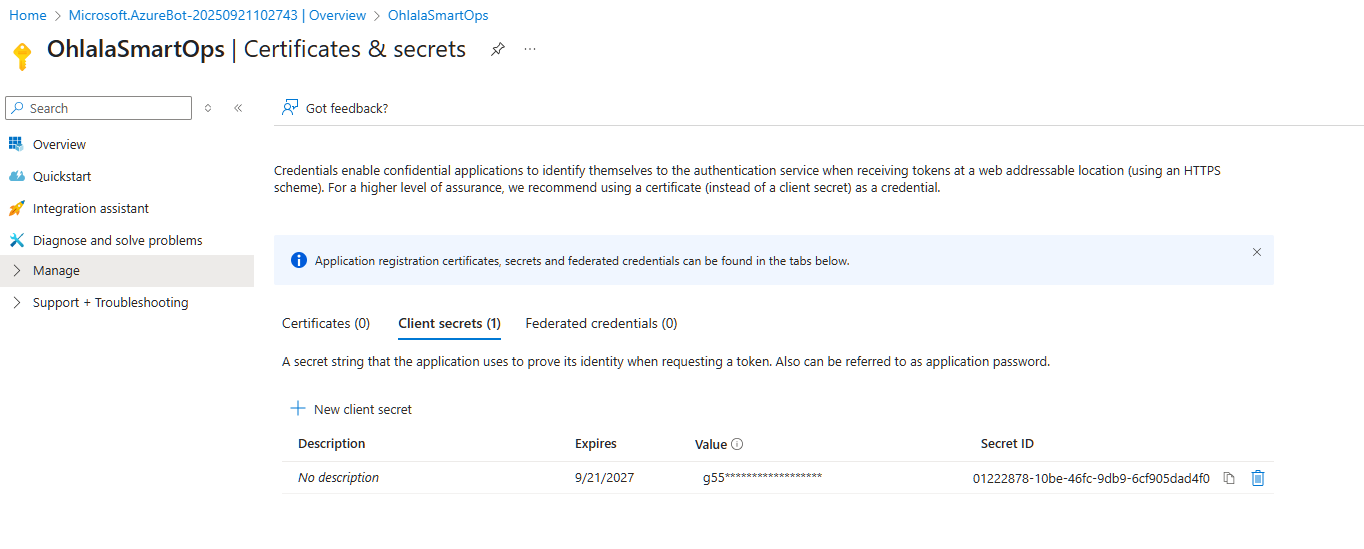
- Configure the secret:
- Description:
Ohlala SmartOps Bot Secret
- Expires: Choose duration (recommend 24 months)
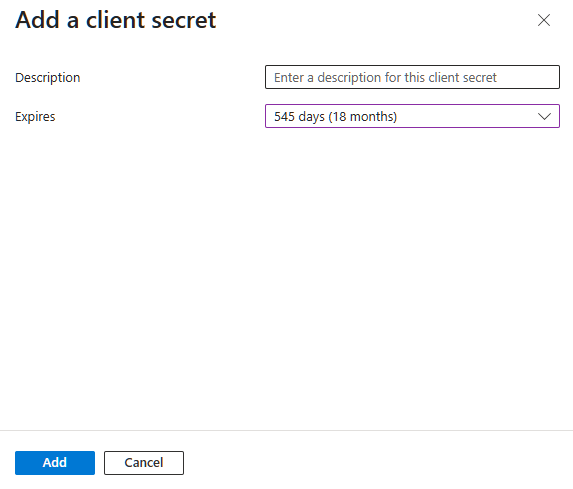
- Click “Add”
- IMPORTANT: Copy the secret value immediately!
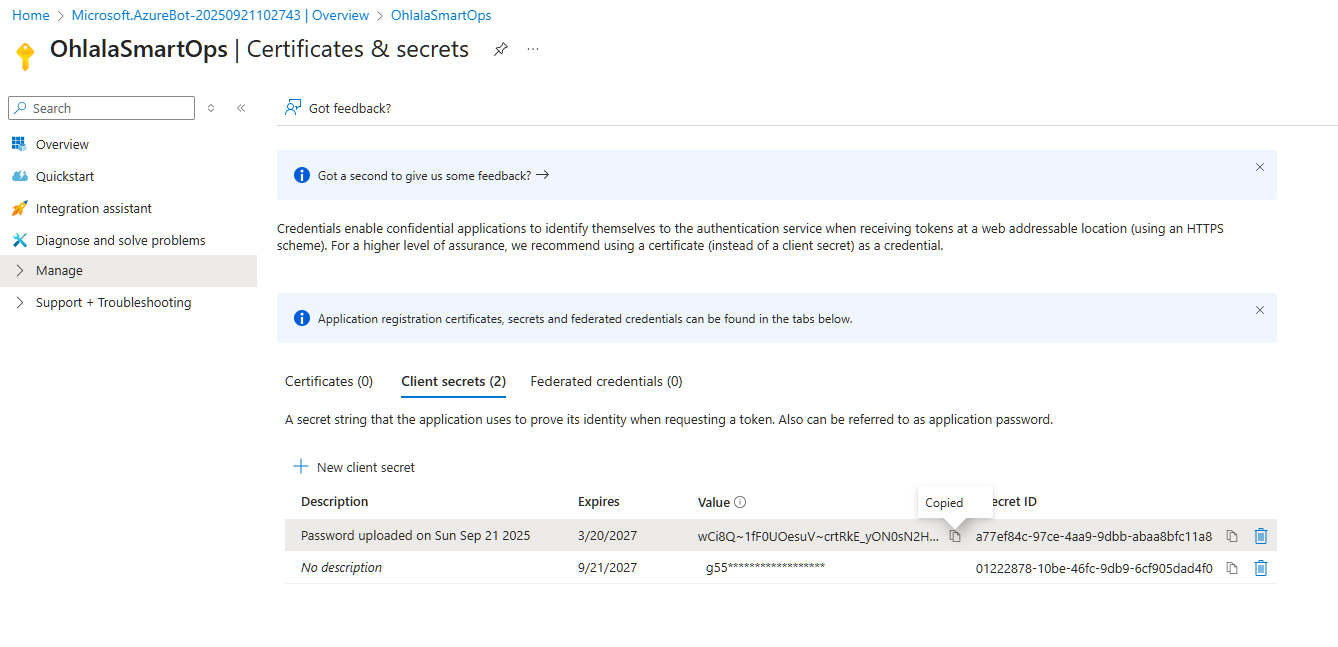
Critical: Save the password now! You cannot view it again after leaving this page.
Get Tenant ID
The Tenant ID is shown in the Azure Portal:
- Click on your account menu (top right)
- Select “Switch directory”
- Your Tenant ID is displayed there
Alternatively:
- Go to Azure Active Directory
- The Tenant ID is on the overview page
Save Your Credentials
You now have three critical values needed for deployment:
| Credential |
Where to Find |
Example |
| Microsoft App ID |
Bot Configuration page |
12345678-1234-1234-1234-123456789012 |
| Microsoft App Password |
Client secrets (copied) |
AbC123... (long string) |
| Microsoft App Tenant ID |
Azure AD or account menu |
87654321-4321-4321-4321-210987654321 |
Security Note: Keep these credentials secure. Never commit them to source control or share them publicly.
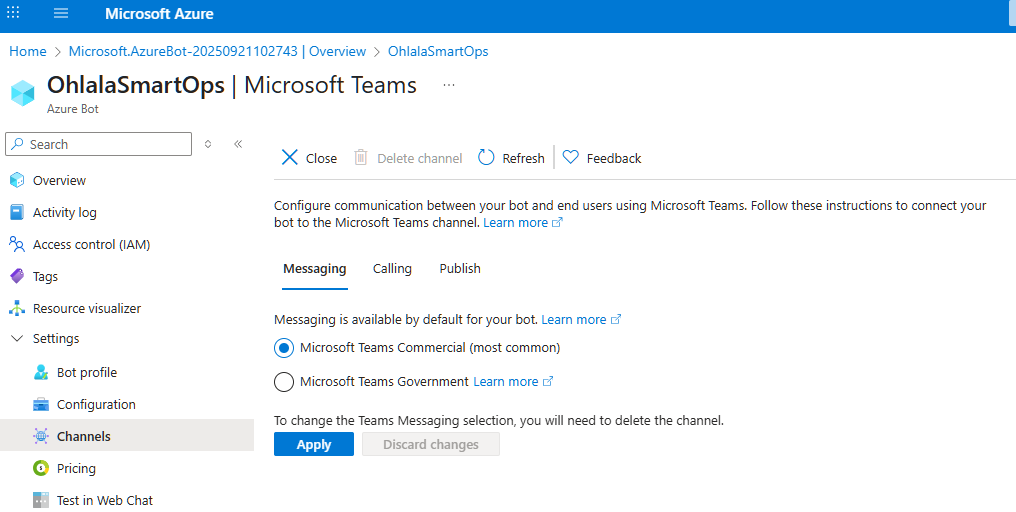
1. Open Channels Page
In your Azure Bot resource, navigate to Channels in the left sidebar.
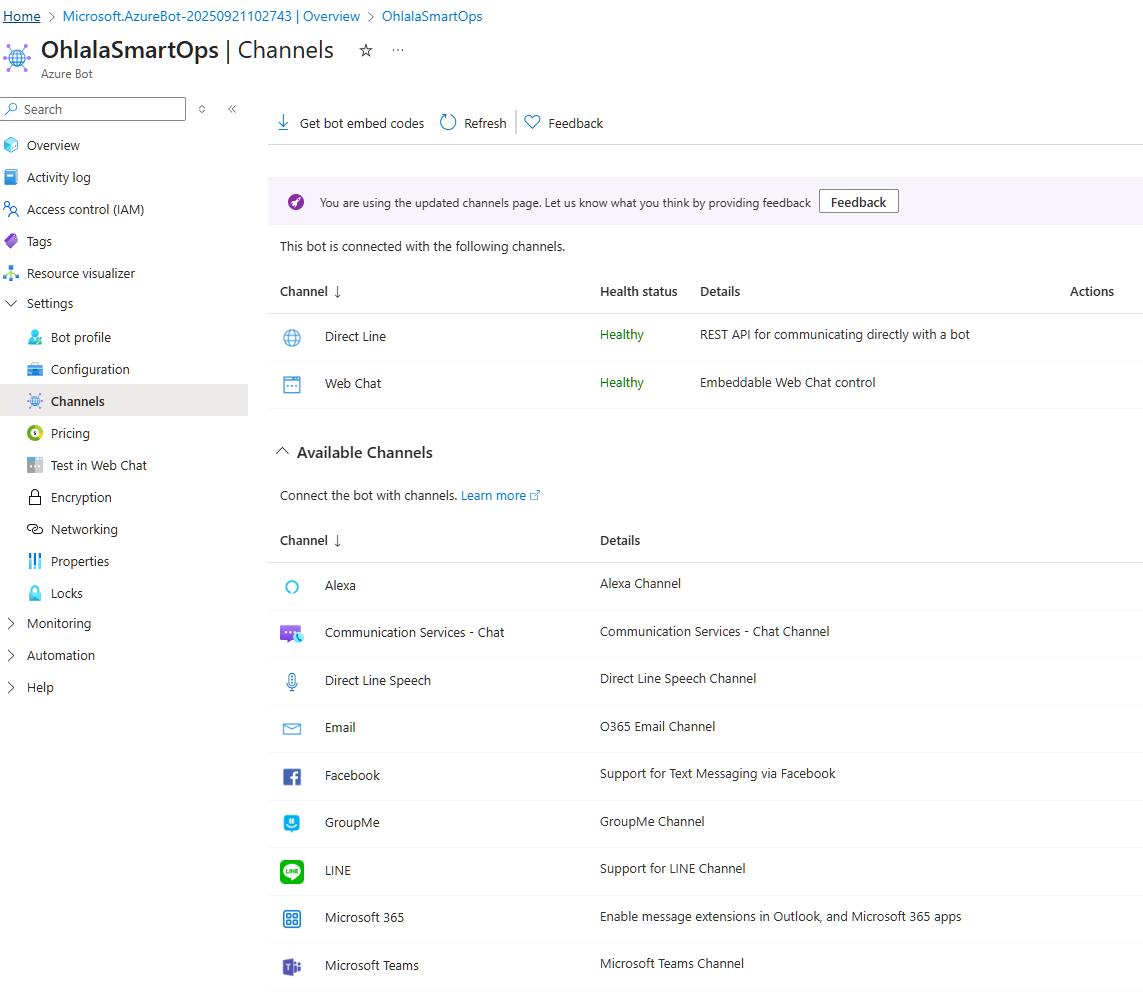
2. Add Microsoft Teams Channel
- Click on the Microsoft Teams icon
- Accept the terms and click “Agree”
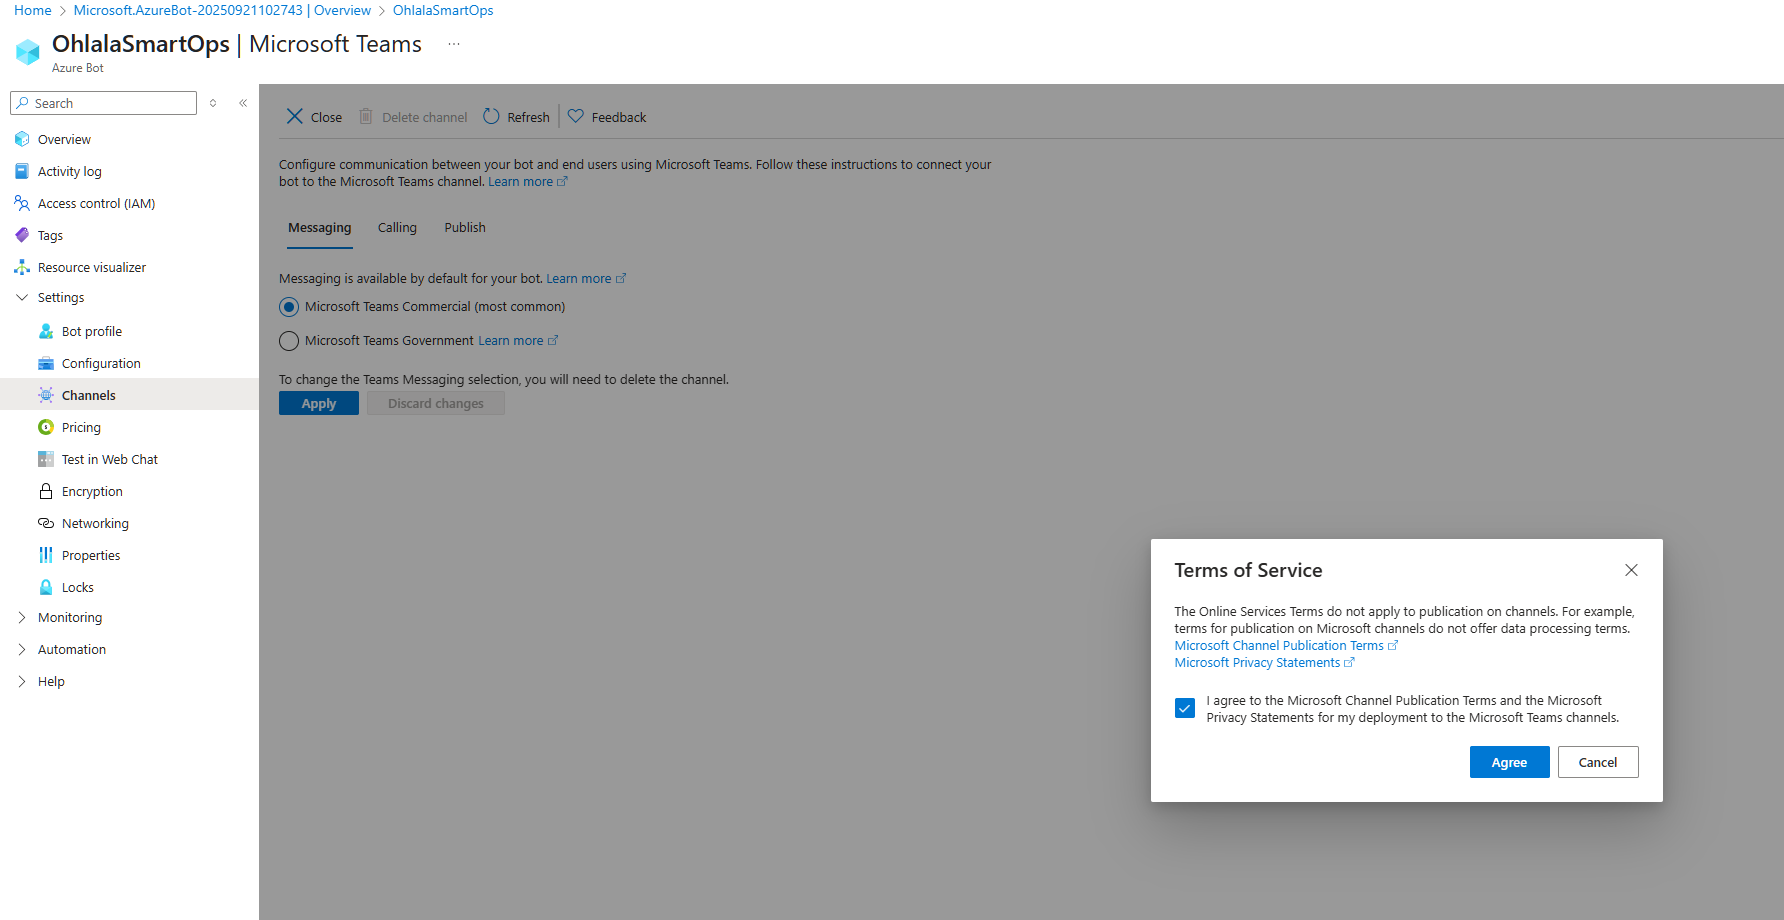
- Click on Apply
Common Issues
Issue: Free Tier Not Available
Solution: F0 tier is limited to one per subscription. Use S1 (Standard) tier instead (~$0.50/month).
Issue: Can’t Create App Password
Solution: You need appropriate permissions in Azure AD. Contact your Azure administrator.
Issue: Lost App Password
Solution: You can create a new client secret:
- Go to Bot Configuration → Manage Password
- Create a new client secret
- Update your deployment with the new password
Next Step
With your Azure Bot configured and credentials saved:
Continue to CloudFormation Deployment →
5 - Google Cloud Setup
Create Google Cloud Project and Service Account for Google Chat integration
Platform Selection: This section is for users who will select
GoogleChat or
Both as their ChatPlatform. Teams-only users: skip to
CloudFormation Deployment.
What You’ll Create
- Google Cloud Project
- Service Account with JSON credentials
- Enabled Google Chat API
Prerequisites
Before starting, ensure you have:
- Google Cloud Platform account with billing enabled
- Google Workspace account (Business, Enterprise, or Education)
Step-by-Step Setup
1. Create Google Cloud Project
Set Up Project
- Go to Google Cloud Console
- Click Select a project then New Project

-
Enter project name: ohlala-smartops (or your preferred name)
-
Click Create

-
Wait for project creation to complete
Important: Note your Project ID (shown below project name). You’ll need this for CloudFormation parameters.
2. Enable Google Chat API
-
In Google Cloud Console, go to APIs & Services then Library
-
Search for Google Chat API

-
Click Google Chat API
-
Click Enable

3. Create Service Account
Create the Account
- Go to IAM & Admin then Service Accounts
- Click Create Service Account

- Enter details:
- Name:
ohlala-smartops-bot
- ID:
ohlala-smartops-bot (auto-generated)
- Description:
Service account for Ohlala SmartOps Chat app

- Click Create and Continue
- Skip the optional steps (roles, access)
- Click Done
Generate JSON Key
- Click on your new service account
- Go to Keys tab
- Click Add Key then Create new key

- Select JSON format
- Click Create
- Save the downloaded JSON file securely

Security: Keep this JSON file secure. It contains credentials that grant access to your Chat app. Never commit it to version control.
You’ll need two values for CloudFormation deployment:
| Credential |
CloudFormation Parameter |
Where to Find |
| Project ID |
GoogleChatProjectId |
Visible in Google Cloud Console (top bar or project settings) |
| Service Account JSON |
GoogleChatServiceAccountInfo |
Downloaded JSON file (converted to single line) |
Convert JSON to Single Line
The service account JSON must be on a single line for CloudFormation. Use one of these methods:
Linux/Mac:
cat service-account.json | jq -c
Windows (PowerShell):
Get-Content service-account.json | ConvertFrom-Json | ConvertTo-Json -Compress
Tip: Copy the output and paste it directly into the CloudFormation GoogleChatServiceAccountInfo parameter.
Summary
At this point, you should have:
Next Step
You’re ready to deploy the CloudFormation stack with your Google Chat credentials:
Continue to CloudFormation Deployment →
6 - Deploy CloudFormation Stack
Deploy the Ohlala SmartOps infrastructure in AWS
What Gets Deployed
The CloudFormation stack creates:
- ECS Fargate cluster with container services
- API Gateway for Teams and/or Google Chat webhooks
- Network infrastructure (VPC, subnets, security groups)
- IAM roles with appropriate permissions
- Secrets Manager for credentials
- CloudWatch logs for monitoring
Deployment Steps
Navigate to CloudFormation in your target region:
https://console.aws.amazon.com/cloudformation/home
Important: Choose the same region where your EC2 instances are located and where you enabled Bedrock.
2. Create New Stack
Click “Create stack” and choose “With new resources (standard)”
3. Upload Template
- Select “Choose an existing template”
- Select “Upload a template file”
- Click “Choose file” and select the template downloaded from AWS Marketplace
- Click “Next”
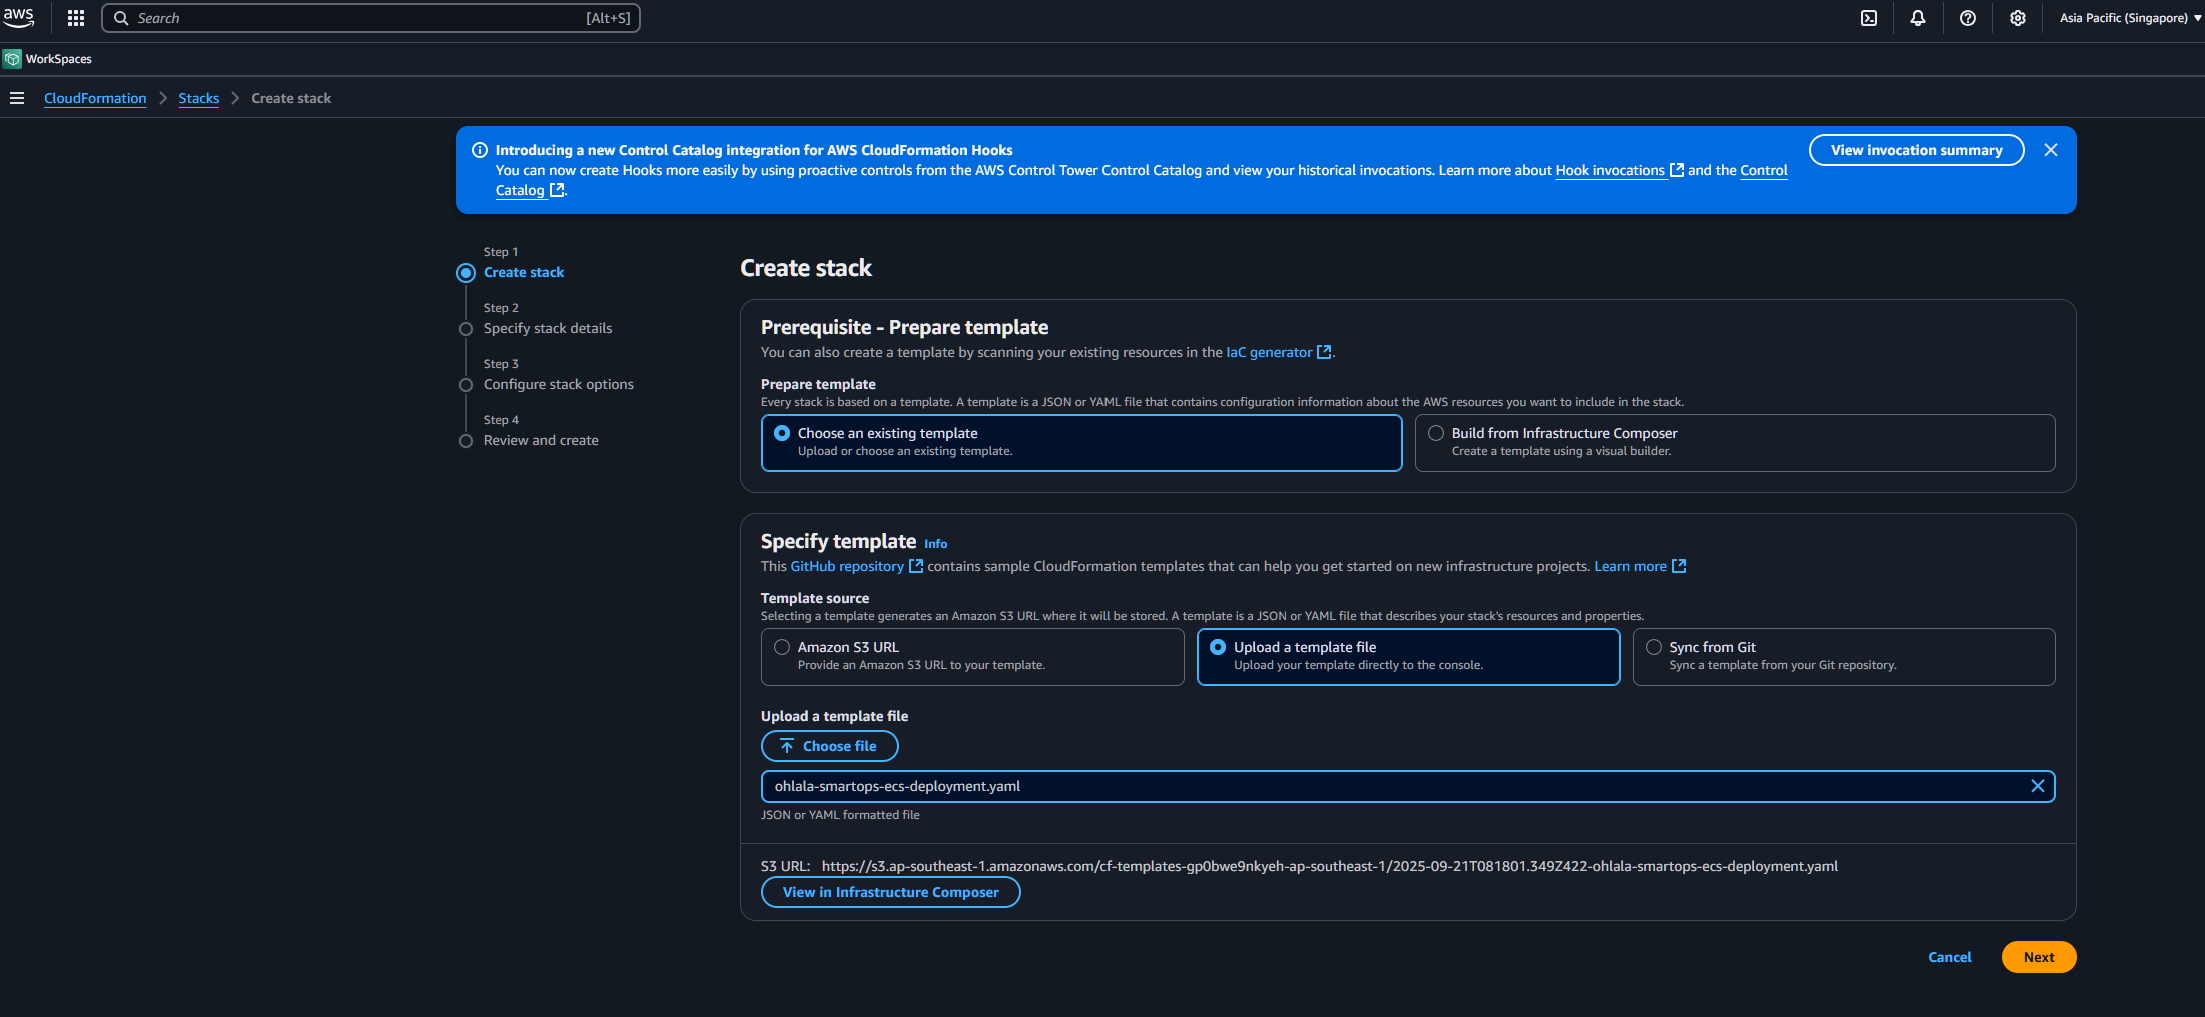
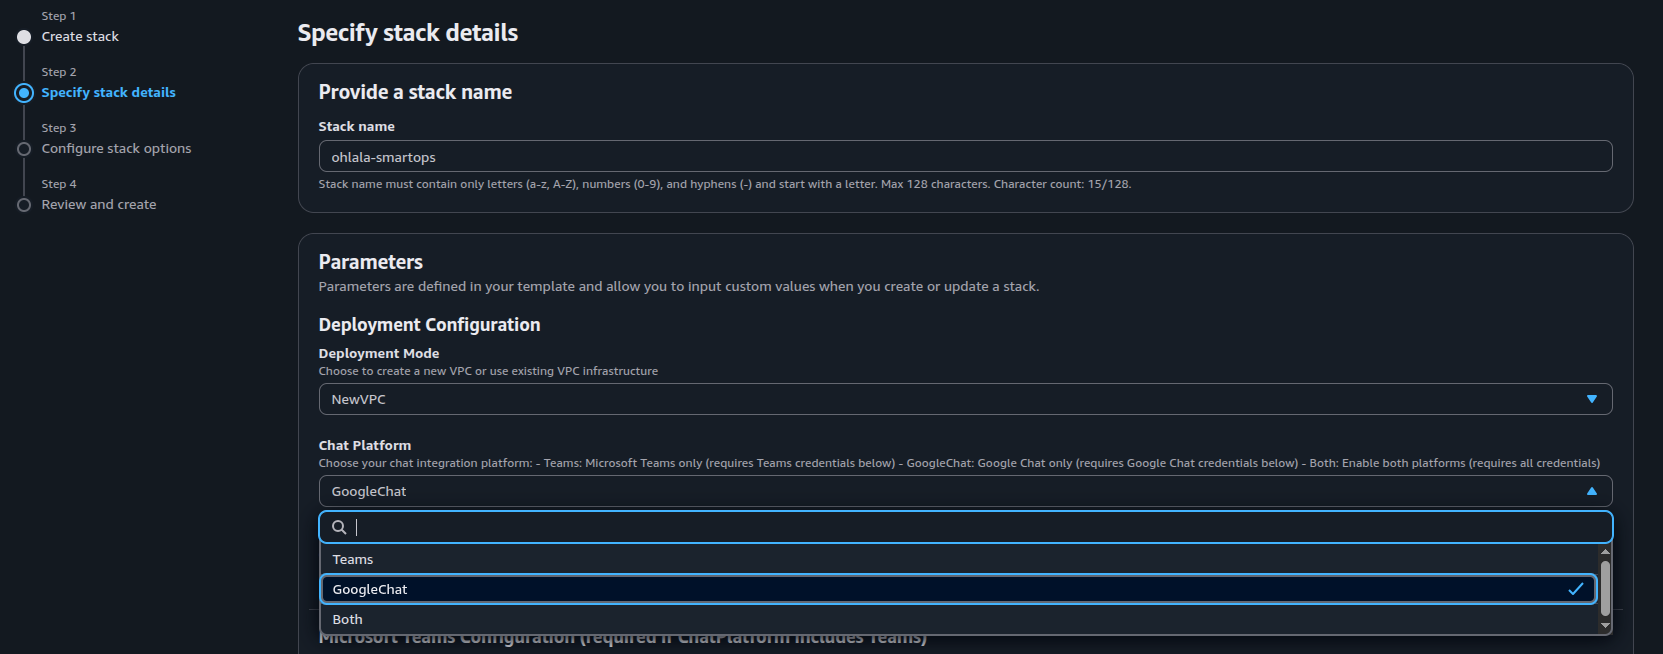
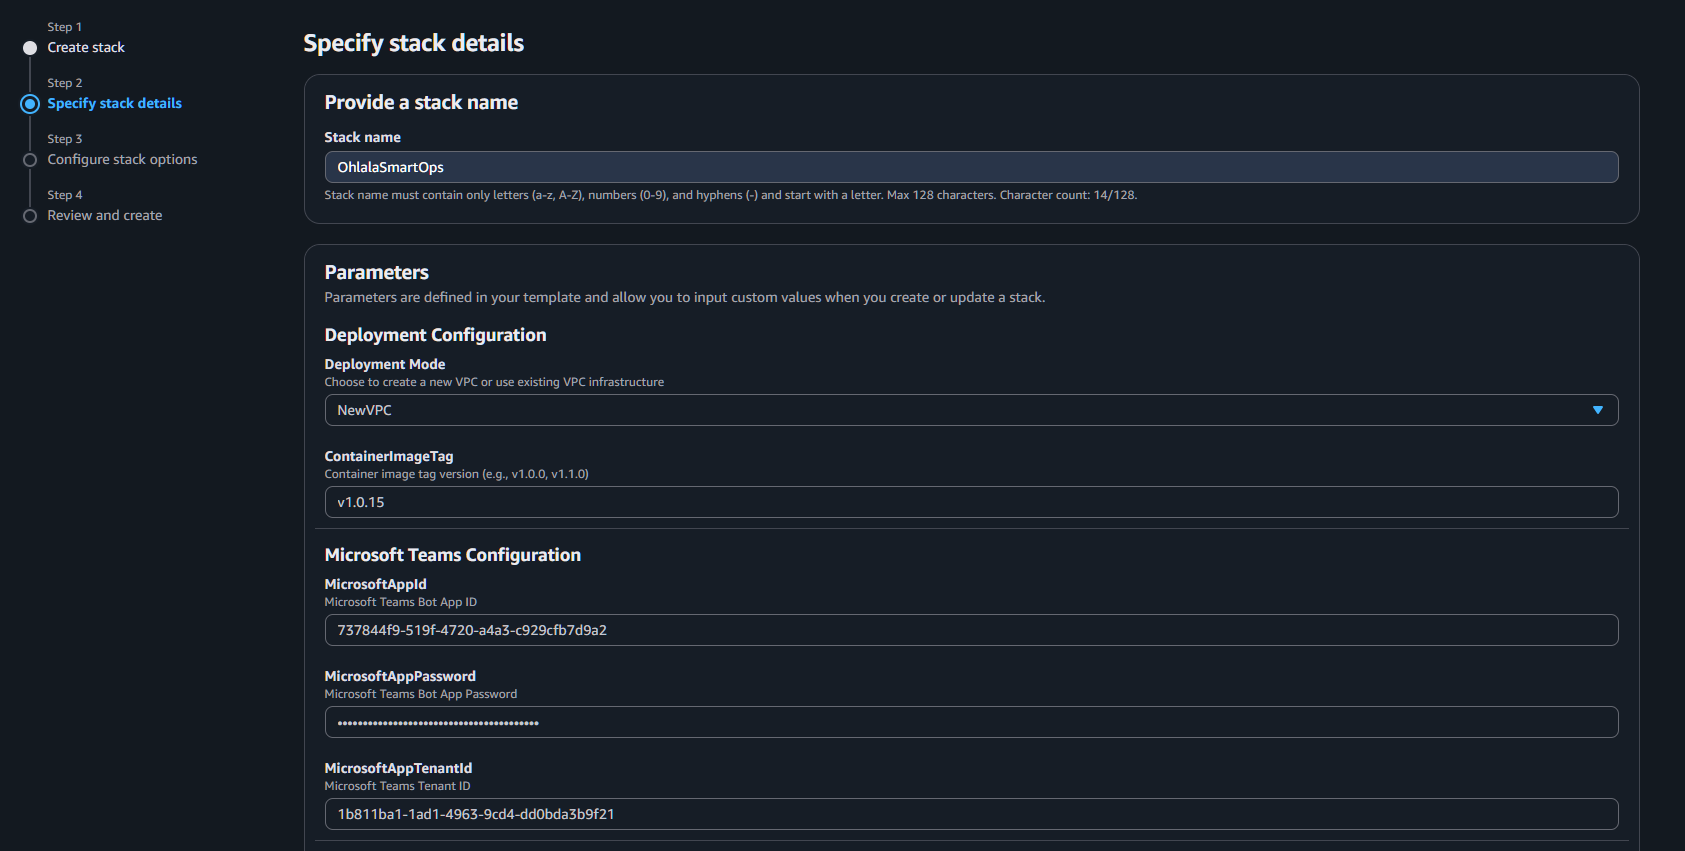
Stack Name
Enter a unique stack name: OhlalaSmartOps (or your preference)
Stack Name: Used to identify resources. Can be anything, but keep it short and memorable.
Required Parameters
Fill in the mandatory parameters:
| Parameter |
Description |
Example/Value |
| DeploymentMode |
VPC configuration |
NewVPC (recommended) |
| ContainerImageTag |
Version to deploy |
v2.0.2 (default) |
| ChatPlatform |
Chat integration to enable |
Teams, GoogleChat, or Both |
| Parameter |
Description |
Example/Value |
| MicrosoftAppId |
From Azure Bot setup |
Your App ID |
| MicrosoftAppPassword |
From Azure Bot setup |
Your App Password |
| MicrosoftAppTenantId |
From Azure Bot setup |
Your Tenant ID |
Note: Skip the Teams parameters if you selected GoogleChat as your ChatPlatform.
| Parameter |
Description |
Example/Value |
| GoogleChatProjectId |
Your GCP project ID |
my-project-123456 |
| GoogleChatServiceAccountInfo |
Service account JSON key (single line) |
{"type":"service_account",...} |
Note: Skip the Google Chat parameters if you selected
Teams as your ChatPlatform. If you haven’t created your Google Cloud credentials yet, complete
Google Cloud Setup first.
VPC Configuration (if NewVPC)
Keep defaults or customize:
- VPCCIDR:
10.0.0.0/16
- PublicSubnet1CIDR:
10.0.1.0/24
- PublicSubnet2CIDR:
10.0.2.0/24
- PrivateSubnet1CIDR:
10.0.10.0/24
- PrivateSubnet2CIDR:
10.0.11.0/24
- EnableNATGateway:
true
Security & Reports Configuration
| Parameter |
Description |
Default |
| AllowedIngressCIDR |
CIDR range allowed to access API Gateway |
0.0.0.0/0 |
| EnableDailyReports |
Enable daily health reports to chat platforms |
true |
| DailyReportSchedule |
Cron expression for report schedule |
cron(0 8 * * ? *) |
Daily Reports: When enabled, health reports are sent to all configured chat platforms (Teams and/or Google Chat) at the scheduled time. Reports include EC2 health metrics, software versions, and available patches.
Schedule Examples:
cron(0 8 * * ? *) - Every day at 8am UTCcron(0 9 ? * MON-FRI *) - Weekdays at 9am UTCcron(0 14 * * ? *) - Every day at 2pm UTC
AllowedIngressCIDR: The default 0.0.0.0/0 is recommended because Microsoft Teams Bot Framework uses dynamic Azure IPs globally. Security is enforced by JWT token validation in the Lambda Authorizer, not IP filtering. Only change this if you have specific corporate network restrictions.
Click “Next”
On the stack options page:
- Tags: (Optional) Add tags for resource organization
- Permissions: Leave default
- Advanced options: Leave default
Click “Next”
6. Review and Create
- Review all settings
- Check the acknowledgment box:
- I acknowledge that AWS CloudFormation might create IAM resources with custom names
- Click “Submit”
7. Monitor Deployment
The stack creation takes 5-10 minutes. Monitor progress:
- Select your stack in the CloudFormation console
- Check the Events tab for real-time updates
- Wait for status: CREATE_COMPLETE
Success Indicators:
- Stack status shows
CREATE_COMPLETE
- All resources in the Resources tab show
CREATE_COMPLETE
- No errors in the Events tab
Get Stack Outputs
Once deployment completes, get the important URLs:
- Select your stack
- Go to the Outputs tab
- Save these values:
| Output |
Description |
Use |
| TeamsWebhookURL |
API Gateway endpoint for Teams |
Configure in Azure Bot |
| GoogleChatWebhookURL |
API Gateway endpoint for Google Chat |
Configure in Google Chat API |
| APIGatewayEndpoint |
Base API URL |
Reference only |
| ECSCluster |
Cluster name |
For monitoring |
| ECSService |
Service name |
For monitoring |
Note: You will only see the webhook URL outputs relevant to your selected ChatPlatform.
Verify Deployment
Check ECS Service
- Go to ECS Console → Clusters
- Find your cluster (e.g.,
OhlalaSmartOps-Cluster-...)
- Check service shows 1 running task
Check API Gateway
- Go to API Gateway Console
- Find your API (e.g.,
OhlalaSmartOps-API-...)
- Verify endpoints are created
Check Health Endpoint
Test the health endpoint (no authentication required):
curl https://your-api-id.execute-api.region.amazonaws.com/prod-stackname/health
Should return: {"status": "healthy"}
Troubleshooting
Stack Creation Failed
IAM Role Already Exists
Error: “Resource of type ‘AWS::IAM::Role’ with identifier already exists”
Solution: Use a different stack name, or delete the existing role first
Insufficient Permissions
Error: “User is not authorized to perform: iam:CreateRole”
Solution: Ensure you have admin permissions or required IAM policies
Service Quota Exceeded
Error: “Service quota exceeded”
Solution: Request quota increase or deploy in different region
Stack Stuck in CREATE_IN_PROGRESS
- Check Events tab for specific resource causing delay
- ECS service can take 3-5 minutes to stabilize
- If stuck >15 minutes, consider deleting and retrying
Next Step
With infrastructure deployed and webhook URL ready, continue based on your ChatPlatform selection:
7 - Connect to Microsoft Teams
Configure the webhook and install the bot in Microsoft Teams
Platform Selection: This section is for users who selected
Teams or
Both as their ChatPlatform in CloudFormation. If you selected
GoogleChat only, proceed to
Google Chat Integration.
- Azure Bot webhook endpoint
- Teams channel connection
- Bot app installation
- Initial testing
Integration Steps
Get the Webhook URL
From your CloudFormation stack outputs, copy the TeamsWebhookURL:
https://xxx.execute-api.region.amazonaws.com/prod-stackname/api/messages
Update Bot Configuration
- Go to Azure Portal
- Navigate to your Azure Bot resource
- Go to Configuration under Settings
- Set Messaging endpoint to your webhook URL
- Click Apply to save
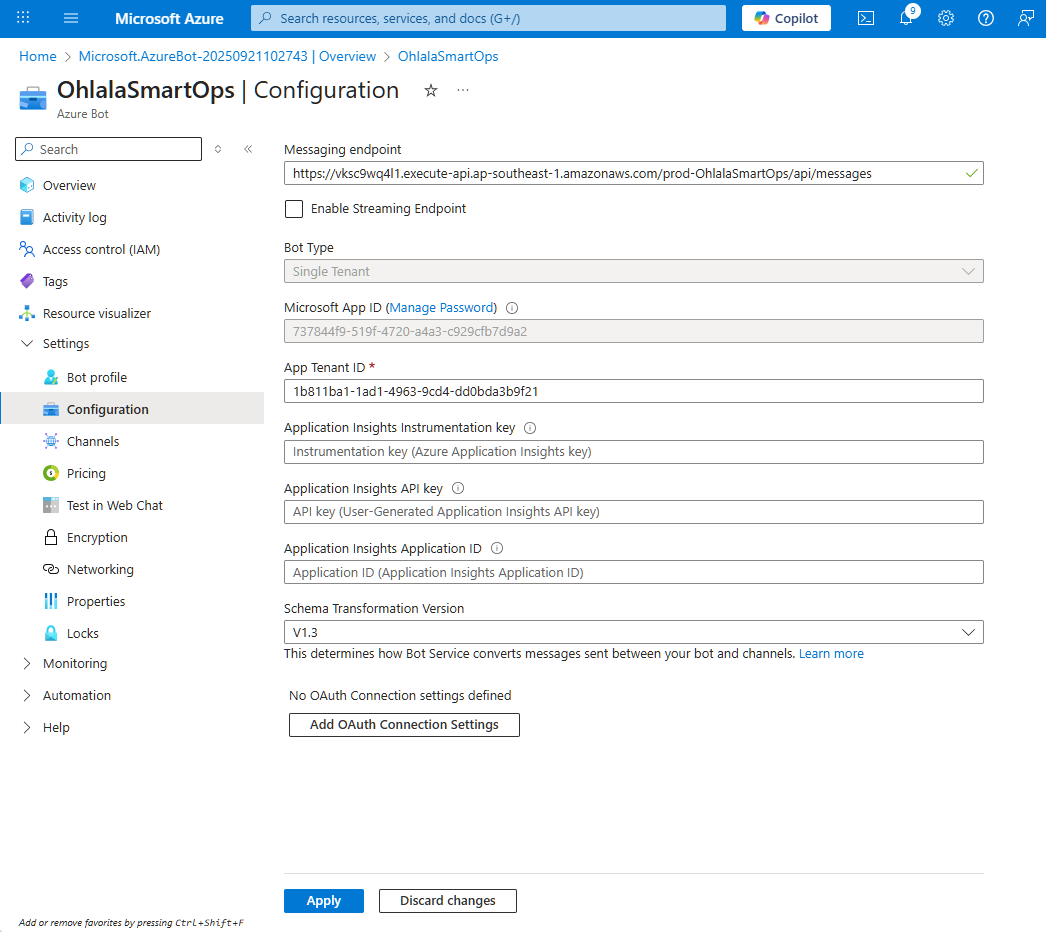
Important: The URL must be exactly as shown in CloudFormation outputs, including /api/messages
2. Install Teams App
-
Download the Teams app package:
Ohlala SmartOps Teams App
-
Customize the manifest:
- Extract the zip file
- Edit
manifest.json
- Replace
YOUR_APP_ID with your Microsoft App ID
- Re-zip the files
-
Install in Teams:
- Open Microsoft Teams
- Go to Apps in the left sidebar, then Manage your apps
- Click Upload an app
- Select Upload a custom app
- Choose your zip file
- Click Add to install


N.B.: You can also ask your Teams admin to upload the app for you if you lack permissions on Teams Admin portal
4. Add Bot to Team or Chat
For Personal Use
- Find Ohlala SmartOps in your apps
- Click Add
- Start chatting directly with the bot
For Team Use
- Go to your team
- Click ⋮ (More options) → Manage team
- Go to Apps tab
- Click Upload a custom app
- Select your app
- Click Add to team
Permissions: Team owners can add apps. Members may need approval depending on your Teams settings.
Test the Connection
Send Test Message
In Teams, message the bot:
@Ohlala SmartOps hello
Expected response:
Hello! I’m Ohlala SmartOps, your AI-powered AWS infrastructure assistant.
Type ‘/help’ to see what I can do for you.
Test Basic Command
Try a simple command:
@Ohlala SmartOps /help
The bot should respond with a help card showing available commands.
Verify Integration
Check Connection Status
In Azure Portal
- Go to your bot → Channels
- Microsoft Teams should show Running
- Click Microsoft Teams to see activity
In AWS Console
- Go to CloudWatch → Log Groups
- Find
/aws/ecs/ohlala-smartops-...
- Check for incoming request logs
Monitor API Gateway
- Go to API Gateway Console
- Select your API
- Go to Dashboard
- You should see incoming requests when messaging the bot
Troubleshooting
Bot Not Responding
Check Webhook URL
- Verify URL in Azure Bot Configuration matches CloudFormation output exactly
- Ensure it includes the full path with
/api/messages
Check ECS Service
- Go to ECS Console
- Verify service has 1 running task
- Check task logs for errors
Test Health Endpoint
curl https://your-api.execute-api.region.amazonaws.com/prod-stackname/health
“Service Unavailable” Error
Causes:
- ECS task not running
- API Gateway misconfigured
- Authentication failing
Solution:
- Check ECS service is running
- Verify API Gateway deployment
- Check CloudWatch logs for details
Authentication Errors
Symptoms: 401 or 403 errors in logs
Solution:
- Verify Microsoft App credentials in Secrets Manager
- Ensure Tenant ID is correct
- Check Lambda authorizer logs
Teams App Installation Issues
“App not found”:
- Ensure manifest.json has correct App ID
- Verify bot is published in Azure
“Permissions required”:
- Contact Teams admin to allow custom apps
- Check organizational app policies
Success Checklist
Confirm everything is working:
Next Step
Your bot is connected! Now let’s verify everything and run your first commands:
Continue to Verification & Testing →
8 - Connect to Google Chat
Configure the Chat app and install the bot in Google Chat
Platform Selection: This section is for users who selected
GoogleChat or
Both as their ChatPlatform in CloudFormation. If you selected
Teams only, proceed to
Verification & Testing.
- Chat app settings with webhook URL
- App visibility and permissions
- Bot installation in Google Chat
Prerequisites
Before starting, ensure you have:
- Google Cloud Project created with Chat API enabled (Google Cloud Setup)
- CloudFormation stack deployed with ChatPlatform set to
GoogleChat or Both
- GoogleChatWebhookURL from CloudFormation stack outputs
Integration Steps
1. Get the Webhook URL
- Go to AWS CloudFormation Console
- Select your stack
- Go to the Outputs tab
- Copy the GoogleChatWebhookURL value
The URL looks like:
https://xxx.execute-api.region.amazonaws.com/prod-stackname/api/google-chat
Access Chat API Configuration
- Go to Google Chat API Configuration
- Or navigate: APIs & Services then Enabled APIs then Google Chat API then Configuration
App name: Ohlala SmartOps
Avatar URL: https://767397776277-marketplace.s3.us-east-1.amazonaws.com/Ohlala_logo.png
Description: AI-powered AWS infrastructure management assistant
Enable Interactive features: ON
Functionality: Select both:
- Receive 1:1 messages
- Join spaces and group conversations
Connection settings:
Authentication Audience: Select App URL
Set Visibility
Important: Apps not published through Google Workspace Marketplace must explicitly list allowed users. The app will only appear in “Find apps” for users added here.
- Select “Make this Chat app available to specific people and groups”
- Click Add people or groups
- Enter email addresses of all users who need access to the bot
- Click Save
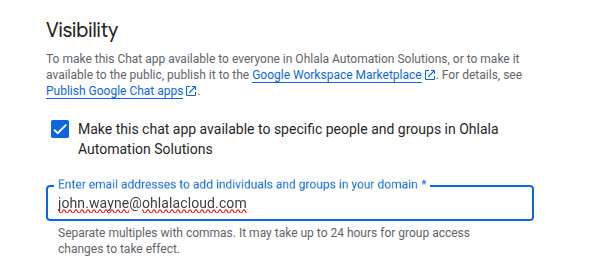
Tip: You can add Google Groups to grant access to multiple users at once.
3. Add Bot to Google Chat
For Personal Use (Direct Message)
- Open Google Chat
- Click + New chat then type “smartops”
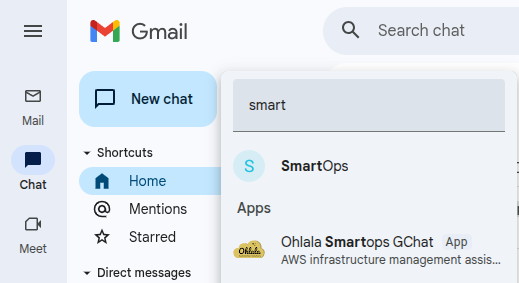
- Search for Ohlala SmartOps
- Click on the app
- Click Add
- Start chatting directly with the bot
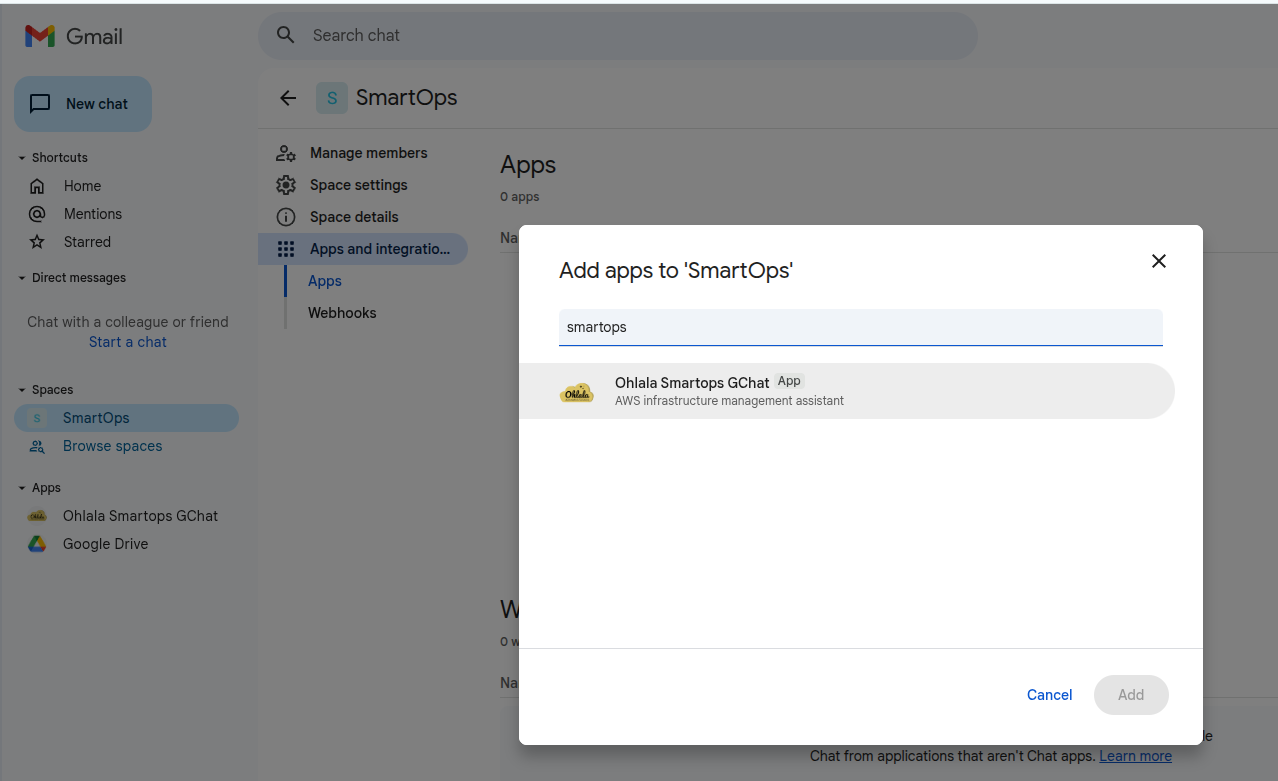
For Space Use (Group)
- Open or create a Google Chat space
- Click the space name then Integrations
- Click Add apps
- Search for Ohlala SmartOps
- Click Add
- The bot will appear in the space
Visibility Note: The app will only appear in search if you’re included in the visibility settings configured in step 2.
Test the Connection
Send Test Message
In Google Chat, message the bot:
@Ohlala SmartOps hello
Or in a direct message:
hello
Expected response:
Hello! I’m Ohlala SmartOps, your AI-powered AWS infrastructure assistant.
Type ‘/help’ to see what I can do for you.
Test Basic Command
Try a simple command:
/help
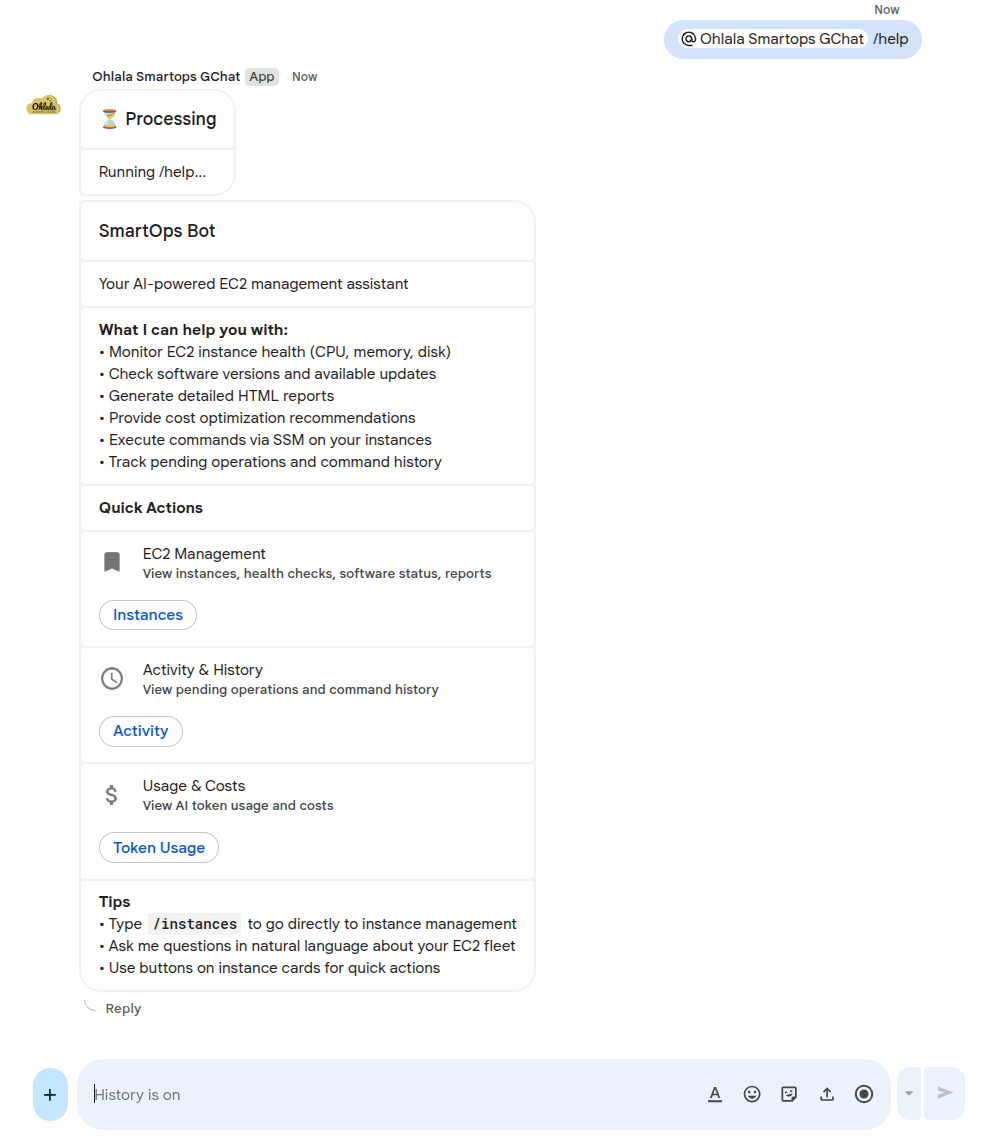
The bot should respond with a help card showing available commands.
Verify Integration
Check Google Chat API
- Go to Google Cloud Console
- Navigate to APIs & Services → Dashboard
- Find Google Chat API
- Click to see usage metrics
Check AWS CloudWatch Logs
- Go to CloudWatch → Log Groups
- Find
/aws/ecs/ohlala-smartops-...
- Look for logs containing
google-chat or incoming POST requests
- Verify requests are being received and processed
Monitor API Gateway
- Go to API Gateway Console
- Select your API
- Go to Dashboard
- You should see requests to
/api/google-chat endpoint
Troubleshooting
Bot Not Responding
Check Webhook URL
- Verify URL in Google Chat API Configuration matches CloudFormation output
- Ensure it includes the full path with
/api/google-chat
Check ECS Service
- Go to ECS Console
- Verify service has running tasks
- Check task logs for errors
Verify Google Chat is Enabled
- Check CloudFormation parameter
ChatPlatform is GoogleChat or Both
- Verify ECS task has the environment variable set
“App Not Found” in Search
Causes:
- App visibility not configured correctly
- You’re not in the allowed users/groups list
- App not yet published (may take a few minutes)
Solution:
- Go to Chat API Configuration
- Check Visibility settings
- Add your email to allowed users
- Wait a few minutes and try again
Authentication Errors
Symptoms: 401 or 403 errors in CloudWatch logs
Solution:
- Verify service account JSON was correct in CloudFormation
- Check the JSON was properly formatted (single line, no extra quotes)
- Verify Project ID matches the service account’s project
- Check Lambda authorizer logs for specific error messages
“Service Unavailable” Error
Causes:
- ECS task not running
- API Gateway misconfigured
- JWT validation failing
Solution:
- Check ECS service is running
- Verify API Gateway deployment
- Check CloudWatch logs for Lambda authorizer errors
- Verify the audience URL in Chat API Configuration matches your endpoint
Card Rendering Issues
Google Chat uses a different card format than Teams. If cards don’t render correctly:
- Check CloudWatch logs for card formatting errors
- Verify the QuickChart sidecar container is running in ECS
- Check S3 bucket for chart images (if using charts)
Google Chat vs Teams Differences
| Feature |
Google Chat |
Microsoft Teams |
| Card Format |
Google Card JSON |
Adaptive Cards |
| Authentication |
Service Account + JWT |
Azure AD + Bot Framework |
| Charts |
Uploaded to S3 as images |
Rendered inline |
| Message Updates |
Limited support |
Full support |
| @mentions |
Required in spaces |
Optional |
Success Checklist
Confirm everything is working:
Next Step
Your bot is connected to Google Chat! Now verify everything is working:
Continue to Verification & Testing →
9 - Verification & Testing
Confirm your deployment and run first commands
Deployment Checklist
Before testing commands, verify each component:
AWS Infrastructure
Microsoft Teams (if using Teams)
Google Chat (if using Google Chat)
Bedrock
Your First Commands
The commands below work in both Microsoft Teams and Google Chat. In Teams, use @Ohlala SmartOps to mention the bot. In Google Chat direct messages, you can type commands directly without mentioning.
1. Test Connection
Teams: @Ohlala SmartOps hello
Google Chat (direct message): hello
Expected Response: Friendly greeting confirming the bot is working
2. Get Help
Teams: @Ohlala SmartOps help
Google Chat: /help
Expected Response: Interactive card with available commands and examples
3. Check Instance Status
show me my EC2 instances
Expected Response: List of your EC2 instances with status information
4. Health Report
/health
Expected Response: Detailed health metrics for your instances
5. Natural Language Query
which instances are running in us-east-1?
Expected Response: Filtered list based on your query
Advanced Testing
Test SSM Integration
@Ohlala SmartOps check disk space on i-1234567890abcdef0
- Verifies SSM command execution
- Returns disk usage information
Test Cost Analysis
@Ohlala SmartOps analyze my EC2 costs
- Checks CloudWatch metrics access
- Provides cost optimization suggestions
Test Multi-Instance Commands
@Ohlala SmartOps show me all stopped instances
- Tests filtering and analysis capabilities
- Demonstrates natural language understanding
Monitoring Your Deployment
CloudWatch Metrics
Monitor key metrics in CloudWatch:
-
ECS Service
- CPU utilization (should be <50%)
- Memory utilization (should be <70%)
- Task count (should be 1)
-
API Gateway
- Request count
- 4XX/5XX errors (should be minimal)
- Latency (should be <3 seconds)
-
Bedrock Usage
- Token consumption
- API throttling events
- Model invocation errors
Common Issues & Solutions
Issue: Bot Not Responding
Quick Diagnosis:
# Check health endpoint
curl https://your-api.execute-api.region.amazonaws.com/prod-stackname/health
Solutions:
- Check ECS task is running
- For Teams: Verify webhook URL in Azure Bot configuration
- For Google Chat: Verify webhook URL in Chat API Configuration
- Ensure the app is installed correctly
- Review CloudWatch logs
Issue: “Model Access Required” Error
Symptom: Bot responds but shows Bedrock error
Solution:
- Go to Bedrock Console then Model access
- Enable Claude Sonnet 4.5
- Wait for “Access granted”
- Retry command (no restart needed)
Issue: No Instances Found
Symptom: Bot works but doesn’t see EC2 instances
Checks:
- Instances are in same region as deployment
- Instances have SSM agent installed
- IAM permissions are correct
- Try:
list all instances in all regions
Issue: Commands Timeout
Symptom: Bot shows “thinking” but never responds
Solutions:
- Check ECS task memory/CPU
- Look for Bedrock throttling
- Verify network connectivity
- Scale ECS service if needed
Issue: Teams Authentication Failures
Symptom: 401/403 errors in logs for Teams requests
Solutions:
- Regenerate Azure Bot credentials
- Update Secrets Manager
- Restart ECS service
- Check tenant ID is correct
Issue: Google Chat Authentication Failures
Symptom: 401/403 errors in logs for Google Chat requests
Solutions:
- Verify service account JSON is correctly formatted (single line)
- Check the service account has the correct permissions
- Verify the Project ID matches the service account
- Check the Authentication Audience setting in Chat API Configuration
Best Practices
- Start simple: Use basic commands first
- Be specific: Include instance IDs for targeted actions
- Use natural language: The bot understands context
- Review suggestions: Always verify before applying changes
Success Indicators
Your deployment is successful when:
- Bot responds within 2-3 seconds
- All test commands work
- No errors in CloudWatch logs
- Costs align with expectations
- Team members can use the bot
Next Steps
Now that your bot is working:
-
Explore Features
- Try advanced commands
- Experiment with natural language queries
- Review health and cost reports
-
Train Your Team
- Share the bot with team members
- Create usage guidelines
- Document common workflows
Getting Help
If you encounter issues:
-
Check Documentation
-
Contact Support
-
Community Resources
Congratulations
You’ve successfully deployed Ohlala SmartOps. Your AI-powered infrastructure assistant is ready to help manage your AWS environment through natural language conversations in Microsoft Teams, Google Chat, or both.
Happy automating!